RAID Diagnostic Toolkit
Please fill in the form below to start your download
RAID Data Recovery over the years, has become increasingly more complex. With the advent of personal computers now shipping with RAID zero as default, RAID cards becoming extremely affordable, and several operating systems offering file system managers that will allow for RAID configurations, it has become apparent to this technician that some type of assistance for the end user is in order. We can no longer assume that RAIDs are only for large corporations because their data needs are different than the home user. A point in fact is that World of Warcraft from Blizzard will run better on a RAID zero setup than a standard single drive configuration since the game is so disk intensive. RAID zero is designed to accelerate disk throughput and thereby enhance your gaming experience.
That being said, what tool does the end user have to help them with a cranky RAID? The tool must be able to number one, find the problem with their RAID, and number two, define what steps may they take to recover their data from that array. Data recovery for an array is extremely expensive and the pricing resides in the neighborhood of $1500.00 to $2000.00 per drive in the array. However, if the end user can define their problem, and relate that clearly to a technician it can lower the costs. I know that I myself have worked out special packages with end users if they assist in some of the labor and shoulder some of the risks. Over eighty percent of the RAIDs that I work on never see a physical lab. I use my own set of software tools, as well as my own experience to recover the RAIDs that I work on.
I now offer you that same set of tools. I am designing, programming, and implementing a set of data recovery tools that anyone can can use to help diagnose a faulty RAID array. This set of tools will mirror my set that I use here everyday. In fact, I will end up using this tool as my everyday recovery aid in as much as there will be enhancements that I have always wanted to put in the software but have never had the time. Since this project has become a priority, I can now dedicate the time to make a very comprehensive RAID Diagnostic Tool Kit.
The software will be released in segments. As I finish a new function, I will update the software, update this blog with an explanation of the function, and offer another post explaining how the new function is used in the context of a real life scenario. It is my hope to introduce a new function every week.
It is a free download from the website and I will also offer a limited amount of free technical support. I would like to caveat that statement by saying I will make the determination of the meaning of the word ‘limited’. You see, I must rein my own curiosity in from time to time as every new problem that you, my end users present, offers a wonderful opportunity to solve the mystery and ultimately help you get your data back. Curiosity may have killed the cat, but it keeps me up at nights!
RAID Data Recovery Toolkit Manual
The function set for the inaugural offering of RAID Diagnostic Toolkit is very basic. This post will explain how to choose a set of ‘streams’ to build a ‘RAID set’. Initially the software does not have any options for stripe size, raid type, meta data offsets, so on and so forth. For the ‘parity check’ function which this current version of this software offers, the assumptions will be a RAID 5, with a 64K stripe size, with no meta data. In future releases of the software these, and many other options will be added in order to make a more robust diagnostic tool.
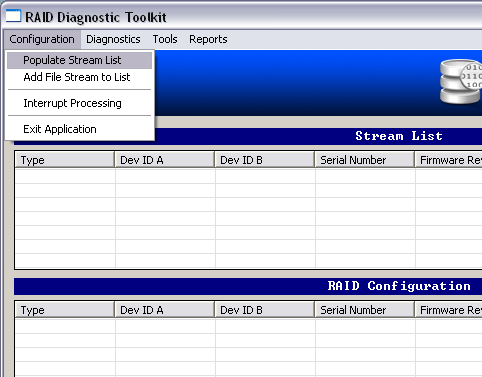
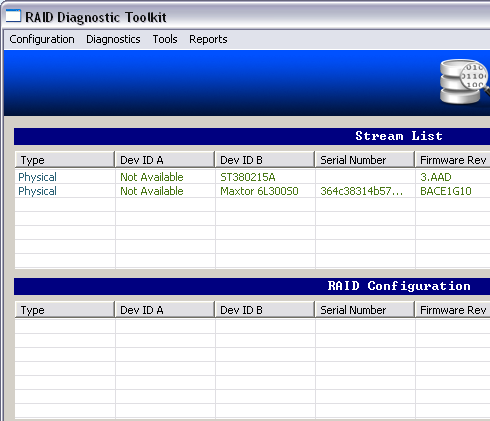
First we must populate the RAID with streams. There are basically two types of streams that we will use, the first is a physical data stream or ‘hard drive’. The second is an image data stream or ‘file’. Figure A depicts populating the ‘stream list’ with physical streams. As you can see the ‘Populate Stream List’ menu item is highlighted. Clicking on this will poll all hard drives on the local machine and display them as shown in Figure B.

Figure A

Figure B
The best way to test an array is to make images of the hard drives and then use the images for testing. From the ‘Configuration’ menu option click on “Add File Stream To List”. A standard Windows file selection dialog box will appear. Go to the proper folder and choose the image that you would like to add to your stream list. Click on the file, and then open and the file will be added to your stream list. You are now free to add this item into your RAID Configuration list.
In order to add an item from the stream list into the RAID Configuration simply double-click on the stream list item and it will be added into the RAID Configuration list of items as depicted in Figure C.

Figure C
Next, in order to start the parity test click on the menu item “Diagnostics”. Doing so will reveal the menu item “Raid Five Parity Check”. Click on that menu item and the diagnostic will begin. This function will check the RAID five on a stripe by stripe basis and validate the parity using XOR mathematics.
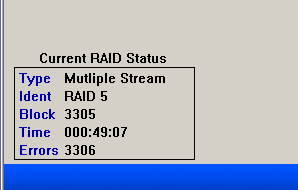
In the lower left hand corner of the software is a small status/information window that offers real time data of the parity scan. this window contains five items which describe the state of the diagnostic.
Type: The configured RAID/River type
Ident: Identifier give to the RAID/River type
Block: The block, currenty being scanned by the software
Time: Time remaining till the scan has completed.
Errors: The total blocks that a parity error has been found.
Two of the five items are most pertinent for this particular function. They are the “Errors” item and the “Block” item. If the “Error” item is ten to fifteen percent of the array then the array stripe is probably corrupt and you may have a stale drive in the array. For all practical purposes however, there should be less that or a total of three or four total errors for the entire array. A healthy array will have no errors and if even only one appears that could mean either the hardware is starting to fail, or worse, the firmware and or its accompanying memory me be buggy. Either scenario could spell disaster for your array and should be looked at immediately. View Figure D as an example.
Figure D
Finally, if you wish to interrupt the diagnostic just click on the “Configuration” menu item, and then the “Interrupt Processing” item and all processing will stop.
That’s it! Of course you must always bear in mind that even if the RAID does not pass the parity test there may still be data to recover. Alternatively if it does pass, this does not necessarily mean that the RAID is good for a rebuild. There will be other functions added to the software that will help you better determine if a rebuild is advisable. It is always a good idea to image each RAID member prior to a rebuild if possible.


